
Sometimes you need to let your Windows 8 Store Apps users to
send email from your Windows 8 Store Application to open a support ticket or
feedback about an issue in your application. In this article we will create a
Windows Store App that can send mails from the About Settings Flyout.
Create a Windows Store App
1.
Open Visual Studio 2012 for
Windows 8.
2.
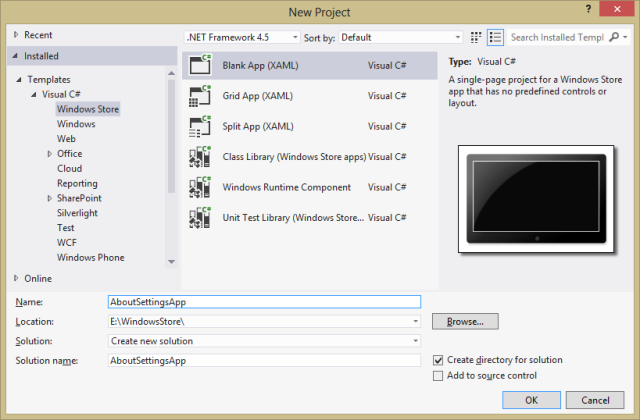
Click on New Project. The
New Project Dialog box appears.
3.
From the left pane select
C# and then Windows Store Templates.
4.
From the right pane select
Grid App Template.
5.
Type your project name and
then click Ok. We set the project name to AboutSettingsApp.
Create the About Flyout UI
1. Open Solution Explorer. Right Click the AboutSettingsApp
project and Click Add New Item. The Add New Item dialog opens
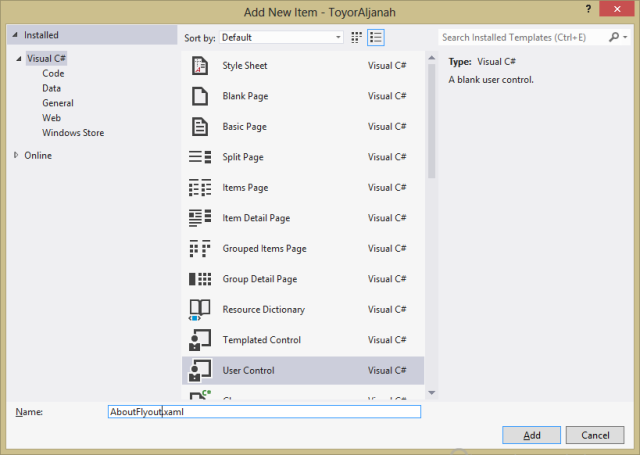
2. Select UserControl from the middle pane.
3. Type the AboutFlyout.xaml in the name textbox and Click Add.
4. Copy the following XAML code and Paste it between the
UserControl begin and End tag.
<UserControl.Resources>
<Style x:Key="SettingsBackButtonStyle" TargetType="Button">
<Setter Property="MinWidth" Value="0"/>
<Setter Property="FontFamily" Value="Segoe UI Symbol"/>
<Setter Property="FontWeight" Value="Normal"/>
<Setter Property="FontSize" Value="26.66667"/>
<Setter Property="AutomationProperties.AutomationId" Value="BackButton"/>
<Setter Property="AutomationProperties.Name" Value="Back"/>
<Setter Property="AutomationProperties.ItemType" Value="Navigation
Button"/>
<Setter Property="Template">
<Setter.Value>
<ControlTemplate
TargetType="Button">
<Grid x:Name="RootGrid" Width="30" Height="30">
<Grid Margin="-6,-6,0,0">
<TextBlock x:Name="BackgroundGlyph" Text="" Foreground="{StaticResource
BackButtonBackgroundThemeBrush}"/>
<TextBlock x:Name="NormalGlyph" Text="{StaticResource
BackButtonSnappedGlyph}" Foreground="{StaticResource
BackButtonForegroundThemeBrush}"/>
<TextBlock x:Name="ArrowGlyph" Text="" Foreground="{StaticResource
BackButtonPressedForegroundThemeBrush}" Opacity="0"/>
</Grid>
<Rectangle
x:Name="FocusVisualWhite"
IsHitTestVisible="False"
Stroke="{StaticResource
FocusVisualWhiteStrokeThemeBrush}"
StrokeEndLineCap="Square"
StrokeDashArray="1,1"
Opacity="0"
StrokeDashOffset="1.5"/>
<Rectangle
x:Name="FocusVisualBlack"
IsHitTestVisible="False"
Stroke="{StaticResource FocusVisualBlackStrokeThemeBrush}"
StrokeEndLineCap="Square"
StrokeDashArray="1,1"
Opacity="0"
StrokeDashOffset="0.5"/>
<VisualStateManager.VisualStateGroups>
<VisualStateGroup x:Name="CommonStates">
<VisualState x:Name="Normal" />
<VisualState x:Name="PointerOver">
<Storyboard>
<ObjectAnimationUsingKeyFrames Storyboard.TargetName="BackgroundGlyph" Storyboard.TargetProperty="Foreground">
<DiscreteObjectKeyFrame KeyTime="0" Value="{StaticResource
BackButtonPointerOverBackgroundThemeBrush}"/>
</ObjectAnimationUsingKeyFrames>
<ObjectAnimationUsingKeyFrames Storyboard.TargetName="NormalGlyph" Storyboard.TargetProperty="Foreground">
<DiscreteObjectKeyFrame KeyTime="0" Value="{StaticResource
BackButtonPointerOverBackgroundThemeBrush}"/>
</ObjectAnimationUsingKeyFrames>
</Storyboard>
</VisualState>
<VisualState x:Name="Pressed">
<Storyboard>
<ObjectAnimationUsingKeyFrames Storyboard.TargetName="BackgroundGlyph" Storyboard.TargetProperty="Foreground">
<DiscreteObjectKeyFrame KeyTime="0" Value="{StaticResource
BackButtonForegroundThemeBrush}"/>
</ObjectAnimationUsingKeyFrames>
<DoubleAnimation
Storyboard.TargetName="ArrowGlyph"
Storyboard.TargetProperty="Opacity"
To="1"
Duration="0"/>
<DoubleAnimation
Storyboard.TargetName="NormalGlyph"
Storyboard.TargetProperty="Opacity"
To="0"
Duration="0"/>
</Storyboard>
</VisualState>
<VisualState x:Name="Disabled">
<Storyboard>
<ObjectAnimationUsingKeyFrames Storyboard.TargetName="RootGrid" Storyboard.TargetProperty="Visibility">
<DiscreteObjectKeyFrame KeyTime="0" Value="Collapsed"/>
</ObjectAnimationUsingKeyFrames>
</Storyboard>
</VisualState>
</VisualStateGroup>
<VisualStateGroup x:Name="FocusStates">
<VisualState x:Name="Focused">
<Storyboard>
<DoubleAnimation
Storyboard.TargetName="FocusVisualWhite"
Storyboard.TargetProperty="Opacity"
To="1"
Duration="0"/>
<DoubleAnimation
Storyboard.TargetName="FocusVisualBlack"
Storyboard.TargetProperty="Opacity"
To="1"
Duration="0"/>
</Storyboard>
</VisualState>
<VisualState x:Name="Unfocused" />
<VisualState x:Name="PointerFocused"
/>
</VisualStateGroup>
</VisualStateManager.VisualStateGroups>
</Grid>
</ControlTemplate>
</Setter.Value>
</Setter>
</Style>
<Style x:Key="FlyoutHyperlink"
TargetType="HyperlinkButton">
<Setter Property="Foreground" Value="#FF606060"/>
<Setter Property="Margin" Value="-20,0,0,0"/>
<Setter Property="FontWeight" Value="SemiLight"/>
</Style>
</UserControl.Resources>
<Grid>
<Border Name="AboutBorder"
BorderBrush="Black" BorderThickness="1,0,0,0">
<Grid Background="White"
VerticalAlignment="Stretch" FlowDirection="LeftToRight">
<Grid.RowDefinitions>
<RowDefinition Height="80"/>
<RowDefinition Height="*"/>
</Grid.RowDefinitions>
<!--Settings
Header-->
<Grid Background="#FF688623" Grid.Row="0">
<Grid Grid.Row="0" Margin="40,32,17,13">
<Grid.Transitions>
<TransitionCollection>
<EntranceThemeTransition FromHorizontalOffset="50"/>
</TransitionCollection>
</Grid.Transitions>
<Grid.ColumnDefinitions>
<ColumnDefinition Width="30"/>
<ColumnDefinition Width="*"/>
<ColumnDefinition/>
</Grid.ColumnDefinitions>
<Button Name="AboutBackButton" Margin="0,3,0,0" Grid.Column="0" Click="AboutBackButton_Click"
Style="{StaticResource SettingsBackButtonStyle}" HorizontalAlignment="Left"
/>
<TextBlock Name="HeaderTextBlock" Text="About" Grid.Column="1" Margin="10,0,0,0"
FontFamily="Segoe UI"
FontWeight="SemiLight" FontSize="24.6667" HorizontalAlignment="Left"
/>
<Image Name="LogoImage" Source="Assets/SmallLogo.png" Margin="0,0,6,0" Grid.Column="2" HorizontalAlignment="Right"
/>
</Grid>
</Grid>
<!--Settings
Content-->
<Grid Grid.Row="1" Margin="40,24,23,0"
VerticalAlignment="Top">
<Grid.Transitions>
<TransitionCollection>
<EntranceThemeTransition FromHorizontalOffset="120"/>
</TransitionCollection>
</Grid.Transitions>
<Grid.ColumnDefinitions>
<ColumnDefinition Width="1*"/>
<ColumnDefinition Width="3*"/>
</Grid.ColumnDefinitions>
<Grid.RowDefinitions>
<RowDefinition Height="Auto"/>
<RowDefinition Height="Auto"/>
<RowDefinition Height="Auto"/>
<RowDefinition Height="Auto"/>
<RowDefinition Height="Auto"/>
<RowDefinition Height="Auto"/>
<RowDefinition Height="Auto"/>
<RowDefinition/>
</Grid.RowDefinitions>
<TextBlock Name="ContactTitleTextBlock" Grid.Row="4" Grid.Column="0" Text="Contact" Style="{StaticResource
FlyoutTextBlock}" Margin="0,5"
/>
<HyperlinkButton Name="ContactHyperlinkButton" Grid.Row="4" Grid.Column="1" Content="Support@UltraDevelopers.net"
Click="ContactHyperlinkButton_Click" Style="{StaticResource
FlyoutHyperlink}" />
</Grid>
</Grid>
</Border>
</Grid>
a.
The above XAML code simply
creates a style for the Back button of the About Flyout and another style for
the HyperlinkButton.
b.
Register the Click event of
the back button.
c.
Adds a parent Grid that
will contain the Control Content.
d.
Inside this Grid we add two
Grids one for Header and the other for content.
e.
Adds a TextBlock control
and name it ContactTitleTextBlock. Sets its Text to Contact.
f.
Add a HyperlinkButton and
Set its Content to your support email and register the Event handler that fires
when a user click on the Hyperlink button.
5. Press F7 to open the Code for the AboutFlyout user
control.
Adding Code to the About Flyout
1. Copy the following code and add it after the AboutFlyout
constructor method.
private void AboutBackButton_Click(object sender, RoutedEventArgs e)
{
if (this.Parent.GetType() == typeof(Popup))
{
((Popup)this.Parent).IsOpen = false;
}
SettingsPane.Show();
}
private async void ContactHyperlinkButton_Click(object sender, RoutedEventArgs e)
{
Uri mailUri = new Uri(string.Format("mailto:{0}?Subject=Your
Application Version {1} for Windows 8",
ContactHyperlinkButton.Content.ToString(), "1.0.0.0"), UriKind.Absolute);
await Launcher.LaunchUriAsync(mailUri);
}
a.
The above code simply
Handle the click event of the Back button. In this event we close the Popup
control that holds the AboutFlyout User Control.
b.
And Show the Settings Pane.
c.
Then we handle the ContactHyperlinkButton
Click event.
d.
We create an instance of
the Uri class and pass to it url that we need to open. In this case we use the mailto
protocol this allows windows to open the default mail Application for Windows 8
which is Mail.
e.
In the mailto
protocol you can pass the To email address, subject, cc, bcc and
even the email message body. In our sample we only pass the To address and
message subject.
2.
Create the UI and adding Code to MainPage
1.
Open the MainPage.xaml.cs
file by double clicking the MainPage.xaml file from the Solution Explorer.
2.
Add the following
namespaces to the start of the MainPage.xaml.cs file.
using Windows.UI.ApplicationSettings;
3.
Add the following lines to
the MainPage.xaml.cs above the MainPage Contructor method
private Rect windowBounds;
private Popup aboutPopup;
private double settingsWidth =
346;
4.
Find the MainPage
Constructor method and add the following code to it after the call to InitializeComponent
method:
public MainPage()
{
this.InitializeComponent();
windowBounds = Window.Current.Bounds;
Window.Current.SizeChanged += Current_SizeChanged;
SettingsPane.GetForCurrentView().CommandsRequested +=
MainPage_CommandsRequested;
}
a.
The above code simply sets
the windowBounds Rect variable created in the MainPage class to the Current
window bounds.
b.
Adds a handler to the CommandsRequested
Event. The CommandsRequested event occurs when the user opens the
settings pane. Listening for this event lets the app initialize the setting
commands and pause its UI until the user closes the pane.
c.
During this event, we will
append our SettingsCommand objects to the available ApplicationCommands vector
to make them available to the SettingsPane UI.
6.
After the MainPage
Constructor method add the following code that will run when the
CommandsRequested event fires.
private void MainPage_CommandsRequested(SettingsPane sender, SettingsPaneCommandsRequestedEventArgs args)
{
SettingsCommand aboutCommand = new SettingsCommand("About", "About", (x) =>
{
aboutPopup = new Popup();
aboutPopup.IsLightDismissEnabled = true;
aboutPopup.Width = settingsWidth;
aboutPopup.Height =
windowBounds.Height;
aboutPopup.Closed += AboutPopup_Closed;
Window.Current.Activated += Current_Activated;
AboutFlyout aboutFlyout = new AboutFlyout();
aboutFlyout.Width = settingsWidth;
aboutFlyout.Height =
windowBounds.Height;
aboutPopup.Child = aboutFlyout;
aboutPopup.SetValue(Canvas.LeftProperty,
windowBounds.Width - settingsWidth);
aboutPopup.SetValue(Canvas.TopProperty, 0);
aboutPopup.IsOpen = true;
});
args.Request.ApplicationCommands.Clear();
args.Request.ApplicationCommands.Add(aboutCommand);
}
private void AboutPopup_Closed(object sender, object e)
{
aboutPopup.Closed -= AboutPopup_Closed;
}
a.
In the above code we simply
create an object of the SettingsCommand class. The SettingsCommand
creates a settings command object that represents a settings entry. This
settings command can be appended to the ApplicationCommands vector.
b.
We set the SettingsCommand
object Id to About.
c.
Set the SettingsCommand Text to About.
d.
Add a handler for the event
that is raised when the user selects the command.
e.
In the command handler we set
the aboutPopup object created in the MainPage class to a new Popup object.
f.
Set the aboutPopup width
and height properties.
g.
Set the aboutPopup IsLightDismissEnabled
to true so that the aboutPopup closes when the user interacts with the
application UI.
h.
Add a handler for the aboutPopup
Closed event.
i.
Add a handler for the Current
Window Activated event.
j.
Create an instance of the
AboutFlyout User control created earlier and set its width and height.
k.
Set the child property of
the aboutPopup to the aboutFlyout object. And finally open the Popup.
l.
Then we clear the ApplicationCommands
vector and add our about Settings Command.
7.
In the AboutPopup_Closed
event handler, we clear the close event handler.
8.
Build your project and run
the project in Simulator.
9.
Open the Settings charm.
You will find two commands. The About command and a system added command for
Permission.
10.
Click on the About settings
command this will open the About Flyout that contains the Contact email.

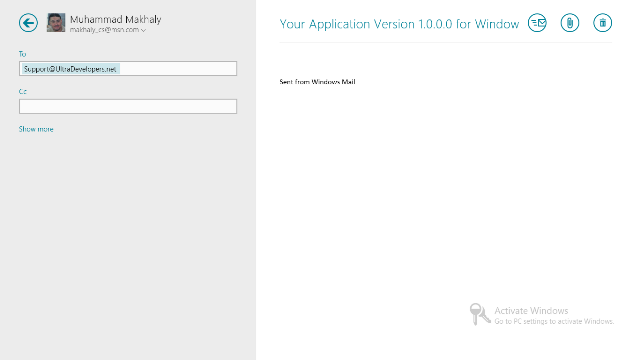
11.
Click on the email address,
this will launch the default email program in Windows 8 which is Mail
Application with the provided email in the two field and provided subject in
the subject field.

15 March 2022

17 February 2022

09 December 2019