Sometimes your application wants to send e-mail notifications to customers such as notifying them about the latest news of your website, telling them activation codes and telling them about latest blog posts. In this article we will make an application that can be used to send emails.
Using the Code:
To make your application send emails to customers, follow these steps:
- Create a new windows application using Visual Studio 2005/2008.
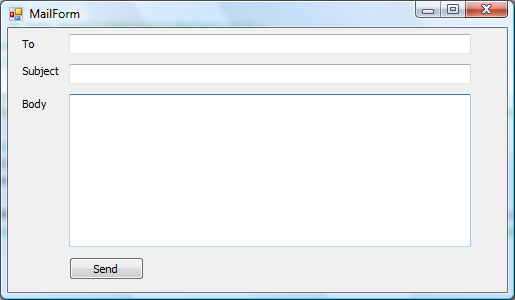
- Rename Form1 to MailForm.
- Add a Label to the MailForm and rename it to ToLabel.
- Add another Label to the MailForm and rename it to SubjectLabel.
- Add another Label to the MailForm and rename it to BodyLabel.
- Add a TextBox to the MailForm and rename it to ToTextBox.
- Add another TextBox to the MailForm and rename it to SubjectTextBox.
- Add another TextBox to the MailForm and rename it to BodyTextBox.
- Import the System.Net and System.Net.Mail namespaces using the following statement:
using System.Net;
using System.Net.Mail;
- The System.Net namespace provides a simple programming interface for many of the protocols used on networks today.
- The System.Net.Mail namespace contains classes used to send electronic mail to a Simple Mail Transfer Protocol (SMTP) server for delivery.
- Add an ErrorProvider component to the MailForm and name it errorProvider. The Error Provider provides a user interface for indication that a control on the form has an error associated with it.
- Add a button to the MailForm and name it SendButton and double click the SendButton in the designer to create the Click event handler in the code.
- Add the following code to the SendButton Click Event Handler:
private void SendButton_Click(object sender, EventArgs e)
{
try
{
errorProvider.Clear();
if (string.IsNullOrEmpty(ToTextBox.Text))
{
errorProvider.SetError(ToTextBox, "Required");
return;
}
if (string.IsNullOrEmpty(SubjectTextBox.Text))
{
errorProvider.SetError(SubjectTextBox, "Required");
return;
}
if (string.IsNullOrEmpty(BodyTextBox.Text))
{
errorProvider.SetError(BodyTextBox, "Required");
return;
}
SmtpClient smtpclient = new SmtpClient();
MailMessage mailMessage = new MailMessage();
mailMessage.DeliveryNotificationOptions = (DeliveryNotificationOptions.OnFailure | DeliveryNotificationOptions.Delay);
mailMessage.Priority = MailPriority.High;
foreach (string recipient in ToTextBox.Text.Split(';'))
{
mailMessage.To.Add(recipient);
}
mailMessage.Subject = SubjectTextBox.Text;
mailMessage.Body = BodyTextBox.Text;
mailMessage.IsBodyHtml = true;
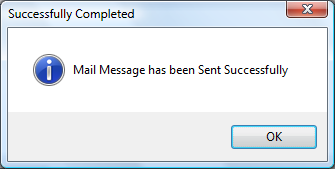
smtpclient.Send(mailMessage);
MessageBox.Show("Mail Message has been Sent Successfully", "Success",
MessageBoxButtons.OK, MessageBoxIcon.Information);
}
catch (SmtpFailedRecipientsException ex)
{
MessageBox.Show(ex.Message, "Error Sending Mail",
MessageBoxButtons.OK, MessageBoxIcon.Error);
}
catch (SmtpException ex)
{
MessageBox.Show(ex.Message, "Error Sending Mail",
MessageBoxButtons.OK, MessageBoxIcon.Error);
}
catch (Exception ex)
{
MessageBox.Show(ex.Message, "Error Sending Mail",
MessageBoxButtons.OK, MessageBoxIcon.Error);
}
finally
{
}
}
- In the above code:
- First of all we clear any error in the errorProvider component by calling the Clear method of the errorProvider.
- We check that the user enters a value in the ToTextBox and we notify him if no value is entered. You will see a blinking red image beside the text box if no value is entered and if you stop the mouse over it a tooltip is displayed with a required text.
- We then check that the user enters a value in the SubjectTextBox and we notify him if no value is entered. You will see a blinking red image beside the text box if no value is entered and if you stop the mouse over it a tooltip is displayed with a required text.
- We then check that the user enters a value in the BodyTextBox and we notify him if no value is entered. You will see a blinking red image beside the text box if no value is entered and if you stop the mouse over it a tooltip is displayed with a required text.
- To construct and send an e-mail message by using SmtpClient, you must specify the following information:
- The SMTP host server that you use to send e-mail.
- Credentials for authentication, if required by the SMTP server.
- The e-mail address of the sender.
- The e-mail address or addresses of the recipients.
- The message content.
- Configure the mailSettings section under the system.net configuration section as follows:
- Type the from e-mail address in the from attribute.
- Type the IP address of the SMTP server in host.
- Type the user name and password in the user name and password attributes.
Note: In this sample we set these required information in the application configuration file in the mailSettings section under the system.net configuration section.
<system.net>
    <mailSettings>
        <smtp from="email address" deliveryMethod="Network">
            <network host="ExchangeServer or any SMTP Host" port="25"
                userName="userName" password="password" defaultCredentials="false" />
        </smtp>
    </mailSettings>
</system.net>
- In the above code:
- We create an object of the SmtpClient class and name it smtpclient. This object allows applications to send e-mail by using the Simple Mail Transfer Protocol (SMTP).
- When using the default constructor of the SmtpClient class it will loads the configuration from mailSettings section under the system.net configuration section.
- We create an object of the MailMessage class and name it mailMessage. This object represents an e-mail message that can be sent using the SmtpClient class.
- We then set the mailMessage Delivery Notification Options using DeliveryNotificationOptions property. This property will notify the sender of the message in case of that the message is delayed or the SMTP server has failed to deliver the e-mail message to the recipients.
- We set the Priority of the mailMessage to High Priority.
- Then we split the Text in the ToTextBox and add each recipient to the mailMessage To property. You can send to more than one recipient by adding the recipients separated by ";".
- We set the mailMessage subject to the text entered in the SubjectTextBox.
- We set the mailMessage body to the text entered in the BodyTextBox.
- If the mailMessage body you typed contains Html code you should set the mailMessage.IsBodyHtml property to true.
- After setting all the properties of the mailMessage we call the smtpClient Send method to send the mail message to the list of recipients.
- Now compile and run the application.
- Enter any to recipients list in the ToTextBox, subject of the mail message in the SubjectTextBox and body of the mail message in the BodyTextBox and click on the Send button.
- You will be notified if the message is sent or the error message.
Now you have an application that can send e-mail messages to customers and this is the final look of the application: