
Sometimes you want your website users to query your database with date ranges like querying their orders, transactions or their statements. One solution is to display From Date and To Date fields and let the user to type the date range. The other solution is display a predefined date ranges like Today, Yesterday, Last 7 Days and a custom option to let the user enter the date range he wants.
In this article we will create an ASP.NET User control that display a predefined date ranges and allow the user to enter a custom date range and facilitate the selection of dates using the Calendar Extender from the AJAX Toolkit to display a calendar to facilitate the selection of dates.
Using the Code:
To create an ASP.Net Indicator control, follow the following steps:
1. Create a new ASP.NET Web Application using Visual Studio 2008/2010.
2. Rename WebForm1.aspx to Default.aspx.
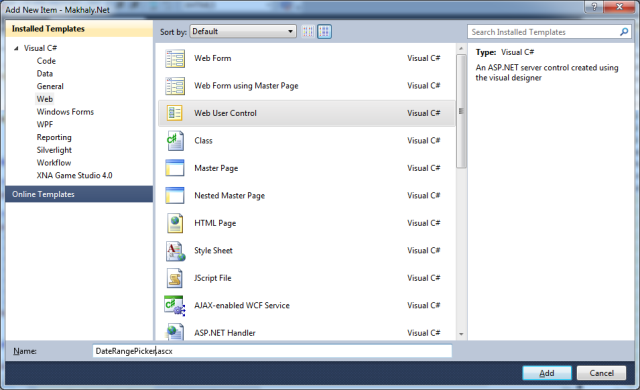
3. Right click the project in Solution Explorer and select Add New Item. The Add New Item Dialog will appear.
4. Select Web in the Left Pane and from the right pane select the Template for Web User Control.
5. Name it DateRangePicker.ascx as in the following image
6. Visual Studio will add three files
a. DateRangePicker.ascxfor the control interface
b. DateRangePicker.ascx.csthe code behind file
c. DateRangePicker.ascx.designer.csthe designer code behind file.
7. Open the DateRangePicker.ascxfile and type the following ASP.Net Code to create the User Control Interface
<table id="DateRangePickerTable">
<tr>
<td id="Td1" runat="server">
<asp:Label ID="PeriodLabel"runat="server"Text="Period"></asp:Label>
</td>
<td id="Td2" colspan="7" class="TdStyle"runat="server">
<asp:DropDownList ID="DateRangeList"runat="server"Width="100px">
<asp:ListItem Text="Today"Value="0"/>
<asp:ListItem Text="Yesterday"Value="1"/>
<asp:ListItem Text="Last 7 Days"Value="2"/>
<asp:ListItem Text="Last 14 Days" Value="3" />
<asp:ListItem Text="Last 30 Days"Value="4"/>
<asp:ListItem Text="Last 60 Days"Value="5"/>
<asp:ListItem Text="Period"Value="6"/>
</asp:DropDownList>
</td>
</tr>
<tr id="DatePeriodRow"style="display: none;">
<td>
<asp:Label ID="FromLabel"runat="server"Text="From Date"></asp:Label>
</td>
<td width="108">
<asp:TextBox ID="FromDateTextBox"runat="server"Width="100px"></asp:TextBox>
<ajaxToolkit:CalendarExtender ID="FromDateCalendarExtender"runat="server"Enabled="True"
PopupButtonID="FromDateImageButton"TargetControlID="FromDateTextBox">
</ajaxToolkit:CalendarExtender>
<ajaxToolkit:MaskedEditExtenderID="FromDateMaskedEditExtender"runat="server"CultureName="ar-EG"
Enabled="True"Mask="99/99/9999"MaskType="Date"TargetControlID="FromDateTextBox">
</ajaxToolkit:MaskedEditExtender>
</td>
<td style="height: 20px; padding-top: 5px; width: 50px;">
<asp:ImageButton ID="FromDateImageButton"runat="server"ImageUrl="~/Images/AJAXCalendar.png"
CausesValidation="False"ImageAlign="Baseline"/>
</td>
<td id="Td5" runat="server">
<ajaxToolkit:MaskedEditValidatorID="FromDateMaskedEditValidator"runat="server"
Display="Dynamic"ControlExtender="FromDateMaskedEditExtender"ControlToValidate="FromDateTextBox"
EmptyValueMessage="Required"ErrorMessage="FromDateMaskedEditValidator"InvalidValueMessage="Invalid Date"
SetFocusOnError="True"IsValidEmpty="False"></ajaxToolkit:MaskedEditValidator>
</td>
<td>
<asp:Label ID="ToLabel"runat="server"Text="To Date"></asp:Label>
</td>
<td width="108">
<asp:TextBox ID="ToDateTextBox"runat="server"Width="100px"></asp:TextBox>
<ajaxToolkit:CalendarExtender ID="ToDateCalendarExtender"runat="server"Enabled="True"
PopupButtonID="ToDateImageButton"TargetControlID="ToDateTextBox">
</ajaxToolkit:CalendarExtender>
<ajaxToolkit:MaskedEditExtenderID="ToDateMaskedEditExtender"runat="server"CultureName="ar-EG"
Enabled="True"Mask="99/99/9999"MaskType="Date"TargetControlID="ToDateTextBox">
</ajaxToolkit:MaskedEditExtender>
</td>
<td style="height: 20px; padding-top: 5px; width: 50px;">
<asp:ImageButton ID="ToDateImageButton"runat="server"ImageUrl="~/Images/AJAXCalendar.png"
CausesValidation="False"ImageAlign="Baseline"/>
</td>
<td>
<ajaxToolkit:MaskedEditValidatorID="ToDateMaskedEditValidator"runat="server"Display="Dynamic"
ControlExtender="ToDateMaskedEditExtender"ControlToValidate="ToDateTextBox"
EmptyValueMessage="Required"ErrorMessage="ToDateMaskedEditValidator"InvalidValueMessage="Invalid Date"
SetFocusOnError="True"IsValidEmpty="False"></ajaxToolkit:MaskedEditValidator>
</td>
</tr>
</table>
a. The above code simply creates an HTML table with two rows and eight columns and set its id property to DateRangePickerTable.
b. In the first row we add an ASP.NET Label in the first column and name it PeriodLabel and set its Text property to Period.
c. We then add an ASP.NET DropDownList control and name it DateRangeList in the second column and set it colspan to 7 to span 7 columns.
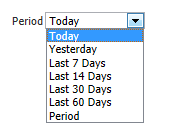
d. We add 7 List items and set its text property to Today, Yesterday, Last 7 Days, Last 14 Days, Last 30 Days, Last 60 Days, Period respectively and its values to 0,1,2,3,4,5,6.
e. Set the second row id property of the DateRangePickerTable to DatePeriodRow, so we can find it from the JQuery script.
f. In the first column we add ASP.NET Label, name it FromLabel and set its Text property to From Date.
g. We then add an ASP.NET TextBox and name it FromDateTextBox.
h. Add an ASP.NET ImageButton control and name it FromDateImageButton and set its ImageUrl property to an image that will display a calendar.
i. Then we add CalendarExtenderfrom the AJAX Controls Toolkit to provide client-side date-picking functionality in a popup control, name it FromDateCalendarExtender, and set its TargetControlID property to FromDateTextBox and its PopupButtonIDto FromDateImageButton.
j. Add MaskedEditExtenderfrom the AJAX Controls Toolkit to apply a "mask" to the input that permits only certain types of characters/text to be entered, name it FromDateMaskedEditExtenderand set its Mask property to "99/99/9999", MaskTypeproperty to Date, and TargetControlID to FromDateTextBox.
k. Add MaskedEditValidatorfrom the AJAX Controls Toolkit for validation, set its ID property to FromDateMaskedEditValidator,ControlExtender property to FromDateMaskedEditExtender, ControlToValidateproperty to FromDateTextBox, EmptyValueMessage property to Required and set its InvalidValueMessage property to Invalid Date.
l. Repeat the steps from f to k for the To Date fields as provided in the sample code above.
8. Add reference to the JQueryJavaScript file from the ASP.NET CDN in the DateRangePicker.ascx file using the following line
<script src="http://ajax.aspnetcdn.com/ajax/jQuery/jquery-1.7.1.min.js"type="text/javascript"></script>
9. Add the following java script code just after the JQuery reference.
<script type="text/javascript">
function pageLoad(sender, args) {
if (args.get_isPartialLoad()) {
var rangeType = $('#<%= DateRangeList.ClientID%>').val();
if (rangeType == 6) {
$('#DatePeriodRow').removeAttr("style");
}
else {
$('#DatePeriodRow').attr("style", "display: none;");
}
}
}
$(document).ready(function () {
$('#<%= DateRangeList.ClientID %>').live("change", function() {
var rangeType = $('#<%= DateRangeList.ClientID %>').val();
if (rangeType == 6) {
$('#DatePeriodRow').removeAttr("style");
}
else {
$('#DatePeriodRow').attr("style", "display: none;");
}
});
$('#<%= DateRangeList.ClientID %>').live("click", function(event) {
$('#<%= DateRangeList.ClientID %>').change();
});
$('#<%= DateRangeList.ClientID %>').live("blur", function() {
$('#<%= DateRangeList.ClientID %>').change();
});
});
</script>
a. The above java script code registers for the change event of the DateRangeList.
b. In this event we get the DateRangeListselected value and check that it is equal to 6 which is the period then we display the DatePeriodRow to let the user select a custom date range.
c. If the DateRangeListis any other value rather than 6 the DatePeriodRow is hidden.
d. We also register for the click and blur client events of the DateRangeList and call the change event of it.
e. We add the pageLoad client event. This event occurs when the page loads on the client browser. We check that if we make an AJAX call and get the DateRangeList selected value and display the DatePeriodRow or hide it.
10. Open the code behind file by pressing F7 key or double clicking on DateRangePicker.ascx.cs
11. Type the following code to create the behavior of the DateRangePicker Control.
public partial class DateRangePicker: System.Web.UI.UserControl
{
private int rangeType;
private string validationGroup;
private DateTime fromDate, toDate;
[Browsable(true)]
[Bindable(true, BindingDirection.TwoWay)]
public DateTime FromDate
{
get
{
int.TryParse(DateRangeList.SelectedValue, out rangeType);
switch (rangeType)
{
//Today
case 0:
fromDate = DateTime.Now.Date;
break;
//Yesterday
case 1:
fromDate = DateTime.Now.AddDays(-1).Date;
break;
//Last7Days
case 2:
fromDate = DateTime.Now.AddDays(-7).Date;
break;
//Last14Days
case 3:
fromDate = DateTime.Now.AddDays(-14).Date;
break;
//Last30Days
case 4:
fromDate = DateTime.Now.AddDays(-30).Date;
break;
//Last60Days
case 5:
fromDate = DateTime.Now.AddDays(-60).Date;
break;
//Period
case6:
DateTime.TryParse(FromDateTextBox.Text,out fromDate);
break;
default:
fromDate = DateTime.Now.Date;
break;
}
return fromDate;
}
set
{
fromDate = value;
FromDateTextBox.Text = fromDate.ToShortDateString();
}
}
[Browsable(true)]
[Bindable(true, BindingDirection.TwoWay)]
public DateTime ToDate
{
get
{
int.TryParse(DateRangeList.SelectedValue, out rangeType);
switch (rangeType)
{
case 0:
case 1:
case 2:
case 3:
case 4:
case 5:
toDate = DateTime.Now.Date;
break;
case 6:
DateTime.TryParse(ToDateTextBox.Text,out toDate);
break;
default:
toDate = DateTime.Now.Date;
break;
}
return toDate;
}
set
{
toDate = value;
ToDateTextBox.Text = toDate.ToShortDateString();
}
}
public string ValidationGroup
{
get
{
validationGroup = FromDateMaskedEditValidator.ValidationGroup;
return validationGroup;
}
set
{
validationGroup = value;
ToDateMaskedEditValidator.ValidationGroup = validationGroup;
FromDateMaskedEditValidator.ValidationGroup = validationGroup;
}
}
[DefaultValue(false)]
public bool IsValidEmpty
{
get
{
return FromDateMaskedEditValidator.IsValidEmpty;
}
set
{
FromDateMaskedEditValidator.IsValidEmpty = value;
ToDateMaskedEditValidator.IsValidEmpty = value;
}
}
protected void Page_Load(object sender, EventArgs e)
{
FromDateMaskedEditValidator.ValidationGroup = validationGroup;
ToDateMaskedEditValidator.ValidationGroup = validationGroup;
}
protected override void OnInit(EventArgs e)
{
base.OnInit(e);
Page.RegisterRequiresControlState(this);
}
protected override object SaveControlState()
{
return fromDate;
}
protected override void LoadControlState(object savedState)
{
fromDate = Convert.ToDateTime(savedState);
}
}
a. In the above code we simply create an integer variable to hold the selected value of the DateRangeList, create a string variable to hold the validation group used, and two DateTime(fromDate and toDate) variables to hold the selected date rang.
b. We create a property named FromDatethat gets or sets the start date of the selected period. In this property get operator we get the selected value of the DateRangeList and set the fromDate variable to the start date of each period. If the user selects today it gets today’s date, for last 7 days we subtract 7 days from Today’s date and so on. If the user selects the Period from DateRangeList, we set the fromDate to the value from the FromDateTextBox Text property after parsing it.
c. In the set operator of the FromDateproperty we set FromDateTextBox to the value.
d. We mark the FromDateproperty with the Browsable attribute to make the Visual Studio able to display this property in the Properties Window and Bindableattribute to make it used in data binding.
e. We create another property named ToDate that represent the end date of the period. We mark it with the Browsable and Bindable attributes.
f. In the get operator of the ToDateproperty we return today’s Date except for the period we return the value selected by the user and written in the ToDateTextBox.
g. In the set operator we set the toDate variable with the value and write it to the ToDateTextBox.
h. We create a property and name it ValidationGroup that sets or gets the FromDateMaskedEditValidatorand ToDateMaskedEditValidator ValidationGroup property.
i. We add a property named IsValidEmptythat gets or sets the IsValidEmpty property of the FromDateMaskedEditValidatorToDateMaskedEditValidator.
j. In the page load event we set the ValidationGroup of the FromDateMaskedEditValidator and ToDateMaskedEditValidatorto the validationGroup variable.
k. Then we override OnInitmethod to tell ASP.Net that this Control state must be persisted.
l. We override SaveControlStateto save the control state and LoadControlState to load the control state as we save it.
Using DateRangePicker User Control:
1. Open the Default.aspx file in design Mode.
2. From the Solution Explorer, Drag the DateRangePicker and drop it on the Default.aspx page. This will register the User Control in the Default.aspx page and create a new instance of the DateRangePicker as in the following code
<%@ RegisterSrc="DateRangePicker.ascx"TagName="DateRangePicker"TagPrefix="uc1"%>
<uc1:DateRangePicker ID="dateRangePicker" runat="server" />
3. Press F7 key to open the Default.aspx.csand write the following code in the Page Load event.
protected void Page_Load(object sender, EventArgs e)
{
if (!Page.IsPostBack)
{
dateRangePicker.FromDate = DateTime.Now.Date;
dateRangePicker.ToDate = DateTime.Now.Date;
}
}
4. The above code simply sets the FromDate and ToDate properties to the today’s date only when the page is loaded for the first time without any post backs.
5. Compile your project and Browse the Default.aspx page in Internet Explorer you will get the following image:

6. Select the Period option from the DateRangeList and the DateRangePicker control will display From Date and To Date Textboxes to write the date period you want as in the following image:

Now you have created an ASP.NET User control that display a predefined date ranges and allow the user to enter a custom date range, and facilitate the selection of dates using the Calendar Extender from the AJAX Toolkit to display a calendar to facilitate the selection of dates.
15 March 2022

17 February 2022
09 December 2019